Hello!
First off, these are all of the things I found/read about trim sheets. Please use these as they're all so good.
Trim Sheet Reference (Free)
- Polygon Academy's Trim Sheet Tutorial
- Reddit Article About Trim Sheets
- Game Textures Full Tutorial (Also adapting pipeline to Blender)
- Environment Iteration Through Trim Sheets by Markus Pichler
- Alex Senechal 80 Level Tutorial
- Alex Senechal Tech Industrial Trim-Sheet Breakdown
- Building a Desert Scene Using Trim Sheets
- Making a High Quality Sci-Fi Modular Environment (Garth Travis)
Extra Tutorials / Resources (Paid)
What are Trim Sheets?


SY Tech Trim Sheet and Snack Bar (Valorant Styled)
You've probably been wondering what trim sheets are supposed to be since I've been talking about them for a while now. A Trim Sheet is a singular UDIM that houses multiple different but very similar textures that are tiled and allows for the model to instead of using its own unique texturing, making the UV's fit within the constraints you assign to create very good looking assets for very cheap. Instead of working from a low poly to high poly to texture phase on each asset, assets using the trim sheet will share a singular texture set (similar to an Atlas for asset packs) bypassing the latter part of the pipeline process and allowing for more specific modeling to be made instead.
My trim sheet layout. If I maintain this layout, I can switch any design onto the assets that use this and it should be an easy change without retexturing every asset.
Basically, it's
great for tiled or repeating objects or trying to save as much budget as you
can on your project. The more things you
can make look unique on a trim sheet, the better off the trim sheet is and more
budget you can get back.

Pipeline Integration
At this point you
may be wondering, how does one create a trim sheet that allows you to be
successful in gaining back budget and can be put towards a bigger asset. Well it's simple, yet very complex when you
get into the grit of it. When
considering the normal pipeline, you see a simple flaw when it comes to the
asset creation:
- Asset is made in Maya or Zbrush (generally speaking)
- Once you're done with the starting model, you go into working on high poly.
- After the high poly is made you start making UV's to sit those textures you made in the high poly onto the low.
- Bake the high and low together to finally texture.

If you see here, its seamless texturing across the assets. The should link up very close to each other with little showing.


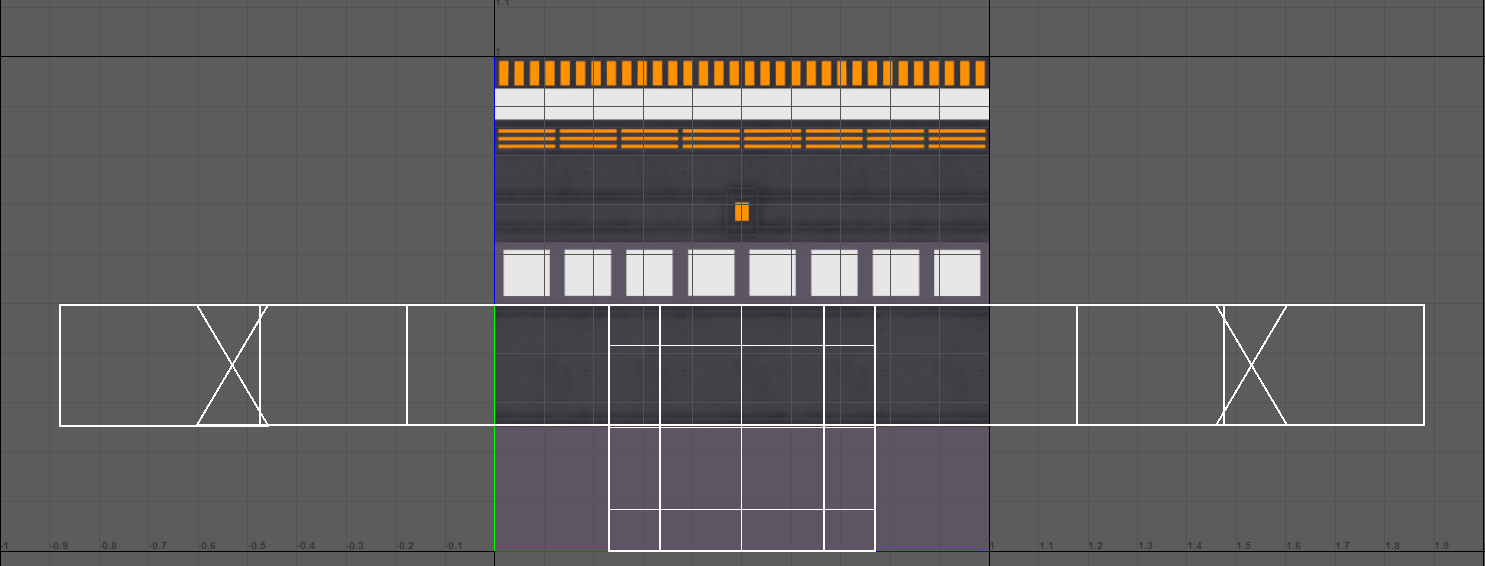
This is how the trim sheet looks when you're placing the UV's onto the screen. Very flat and stretching over mutliple UDIM's, This would be a Substance Painter nightmare, but since you're not needing to do substance anymore its fine.
The total result of what you get from this asset pipeline is 1 asset per completion of the pipeline. That sounds okay for hero assets, but what about all of the back drop assets? Certainly you wouldn't want to every model while still keeping that level of detail you did for the unique one. This is where trim sheets shine! Trim sheets bypass the modeling phase, and only focus on getting the design of the texture good looking to wrap around a model and can be reused multiple times, can be altered, changed, etc. with very little effort. The new pipeline would go like this:
- Cut out Trim Sheet sections and model your specific (tile able textures are musts here!) pieces on how you want it designed
- Once you have the modeling made, take it into high poly and design the weathering ( if you need to)
- Then take it over to a texturing program like Substance to create the look you want the trim to be and export to a texture map.
Now after all this
is done, you would go back to the original pipeline with a change:
- After modeling your asset, you would load in the texture into the UDIM area and begin straightening your UV's to fit the tiled areas you assigned for your Trim Sheet.
- And instead of making a "Unique" texture, you are actually stamping on the trim sheet all over the piece.
- Once you're done, you can reuse this trim sheet over and over again for unique assets.
- Another extra thing is that if you decide to change the visual look of the asset, you can easily change the trim sheet with little to no effort retexturing potentially hundreds of assets later on down the pipeline if a color swatch change happens or someone says they want this to be a different material.
Pitfalls / Limitations
This wouldn't be a
perfect pipeline process if it didn't have some major concerns when starting a
project using trim sheets and its limitations.
- You have to build the trim sheet up before you create the assets. This is very difficult to do before potentially knowing what really it could be used for.
- When they are made, the trim sheet is largely generalized to fit as much information as possible into it to get as much yield of the texture.
- These are potentially not final assets within a game if you do this everywhere. While you can certainly design it to work all the way up to polish, if you wanted to make everything feel unique, this is tougher to do.
There are certainly
more problems when using them, but the benefits outweigh the downsides. In my humble opinion, if the system is
designed from the ground up using them, the visuals will like almost no
different from a unique asset. All about
how well you make them work.

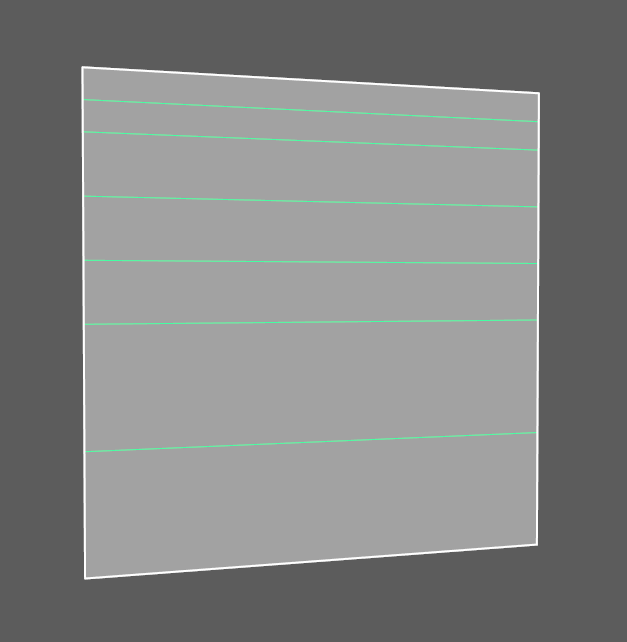
This is what happens when you are using a texture not really suited for it. This particular one is the wall texture and it tiles incorrectly because of the way the whole thing was designed. I would need to make a new trim sheet instead of just using the wall one as it doesn't tile well for floor assets that are supposed to be giving depth.
Helpful Hints
Last part of my work
I think that would help people out.
Personally a lot of this stuff is still shown within my most recent
pieces, so if I were to get back into the piece and redo some things, these are
some helpful tips:
- Coloring the Trim Sheet to be very similar or all one master material would help immensely. You don't want to spread your trim sheet too thin for what it can do otherwise you'll end up not using the whole trim sheet. Both of my current projects I worked on deal with this problem and I am working through now.
- Get the assets and the trim sheet into engine ASAP. It’s the most important and relevant thing out of this process. If you plan on getting good results, make sure you do a lot of testing before committing to a design or else you are going to have a lot of snags. Currently the SY Tech project I've worked on has a lot of that within the floor texturing. They're not well equip for rotational usage, so the texturing tile looks wrong and does not connect to each other seamlessly.
- Make sure you are very rigid for your measurements on your assets. If you plan on modularizing stuff with this pipeline flow (which you should with), then you must be very particular on your scale you plan on running. 1 Meter, 2 Meter, 4 Meter, whatever you end up picking, stick to that guideline otherwise you'll be upset.
- Learn to manipulate your UV's as much as possible. When hero asset UV'ing, you'll generally make UV islands that encompass the whole primitive shape or most of it connected to make it easier to find as well as have good seams. This is not the case for Trim Sheets, they are independent of seams. Meaning you can split things down to single faces if you REALLY wanted to. Not advised, but can be done.


